URLDNS链分析

URLDNS

分析

URLDNS主要用到了两个数据结构:HashMapURL至于为什么是这两个,我们看看他们俩各有什么特性吧~

HashMap

  1. readObject-反序列化的入口

    反序列化一个对象时,Java的ObjectInputStream会调用被反序列化对象readObject方法,以便读取对象的状态并恢复它的字段。在URLDNS中使用了HashMap.readObject()方法

    1
    2
    3
    4
    5
    6
    7
    8
    9
    10
    11
    12
    13
    14
    15
    16
    17
    18
    19
    20
    21
    22
    23
    24
    // HashMap.readObject
    private void readObject(java.io.ObjectInputStream s)
    throws IOException, ClassNotFoundException {
    // Read in the threshold (ignored), loadfactor, and any hidden stuff
    s.defaultReadObject();
    reinitialize();
    if (loadFactor <= 0 || Float.isNaN(loadFactor))throw new InvalidObjectException("Illegal load factor: " + loadFactor);
    s.readInt(); // Read and ignore number of buckets
    int mappings = s.readInt(); // Read number of mappings (size)
    if (mappings < 0) throw new InvalidObjectException("Illegal mappings count: " +mappings);
    else if (mappings > 0) { // (if zero, use defaults)

    ...

    // Read the keys and values, and put the mappings in the HashMap
    for (int i = 0; i < mappings; i++) {
    @SuppressWarnings("unchecked")
    K key = (K) s.readObject();
    @SuppressWarnings("unchecked")
    V value = (V) s.readObject();
    putVal(hash(key), key, value, false, false); //<-------flag: 在这里会调用hash(key)----------
    }
    }
    }
  2. 跟进putVal(hash(key), key, value, false, false); 方法

    1
    2
    3
    4
    5
    //HashMap.hash
    static final int hash(Object key) {
    int h;
    return (key == null) ? 0 : (h = key.hashCode()) ^ (h >>> 16);//<-------flag: 如果key不为空,则调用key.hashCode()方法
    }

到这里我们可以看到 HashMap在执行反序列化过程中会循环调用key的hashCode()方法,
阅读全文

java预编译原理

调试准备

1
2
3
4
5
6
7
8
9
10
11
12
13
14
15
16
17
18
19
20
21
22
23
24
25
26
27
28
29
30
31
public class Main {
public static Connection getConn(String url,String user,String password){

try {
// 加载MySQL JDBC驱动
Class.forName("com.mysql.cj.jdbc.Driver");
// 建立数据库连接
Connection conn = DriverManager.getConnection(url, user, password);
} catch (ClassNotFoundException | SQLException e) {
throw new RuntimeException(e);
}
return null;
}
public static void main(String[] args) {
// 数据库连接URL,格式为:jdbc:mysql://host:port/databaseName
String url = "jdbc:mysql://localhost:3306/db";
// 数据库用户名
String user = "root";
// 数据库密码
String password = "root";
Connection conn = getConn(url, user, password);
try {
PreparedStatement stms = conn.prepareStatement("select * from users where id=?");
stms.setString(1, "1\"and 1=1");
System.out.println("123456");

}catch (Exception e){
System.out.println(e.getMessage());
}
}
}
1
((ClientPreparedStatement) stms).getQueryBindings().getBindValues()[0].getValue()

DarkHole1

前言

靶场地址:

https://www.vulnhub.com/entry/darkhole-1,724/

信息收集

端口扫描

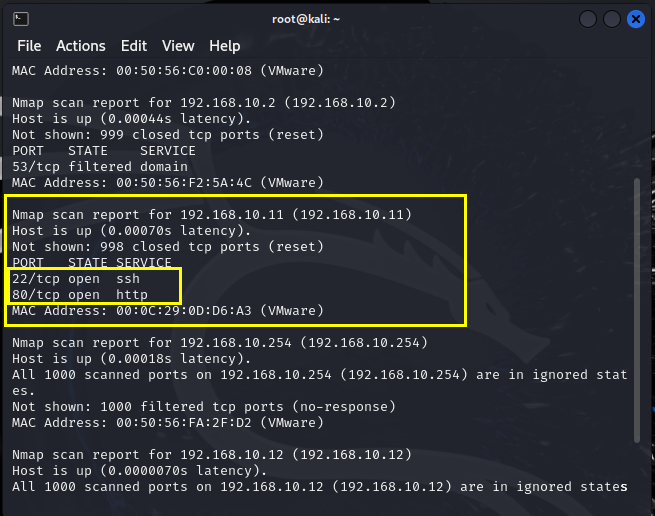
ifconfig查到kali的ip为192.168.10.10

扫描该网段下面的在线设备,确认靶场IP为192.168.10.11,开放的端口有22、80

1
nmap -sS -Pn 192.168.10.0/24

image-20240904234313656

浏览器访问192.168.10.11结果如下:

阅读全文

实验9 根据材料编程

实验任务

在屏幕中间分别显示绿色、绿底红色、白底蓝色的字符串“Welcome to masm!”。

  1. B8000H-BFFFFH共32KB空间为80x25彩色字符模式的显示缓冲区,向这个地址空间写入数据,写入的数据会立刻显示在显示器上。

  2. 显示器一次可以显示25行,每行80个字符,每个字符可设置256种属性。

  3. 一个字符在显示缓冲区中占2个字节,分别存放属性字段和ASCII码。

    image-20240301020128459

  4. 显示缓冲区分为8页,每页4KB(≈4000B)

阅读全文

实验7 寻址方式在结构化数据访问中的应用

实验任务

下面是某公司从 1975 年成立一直到 1995 年的基本情况:

年份 收入 雇员 人均收入
1975 16 3 ?
1976 22 7 ?
1977 382 8 ?
1978 1356 13 ?
1979 2390 28 ?
1980 8000 38 ?
1995 5937000 17800 ?

下面程序已经完成数据的定义:

1
2
3
4
5
6
7
8
9
10
11
12
13
14
15
16
assume cs:codeseg
data segment ;数据段
db '1975','1976','1977','1978','1979','1980','1981','1982','1983'
db '1984','1985','1986','1987','1988','1989','1990','1991','1992'
db '1993','1994','1995'
;存放年份,每一项用4个字节表示
dd 16,22,382,1356,2390,8000,16000,24486,50065,97479,140417,197514
dd 345980,590827,803530,1183000,1843000,2759000,3753000,4649000,5937000
;存放收入,每一项用4个字节表示
dw 3,7,9,13,28,38,130,220,476,778,1001,1442,2258,2793,4037,5635,8226
dw 11542,14430,15257,17800
;存放雇员,每一项用2个字节表示
data ends
table segment
db 21 dup ('year summ ne ?? ')
table ends

编程,将 data 段中的数据按如下格式写入 table 段中,并计算 21 年中的人均收入(取整)并保存到 table 段中:

阅读全文

分析一个奇怪的程序

题目

分析下面的程序,在运行前思考:这个程序可以正确返回吗?

运行后再思考:为什么是这种结果?

通过这个程序加深对相关内容的理解。

阅读全文

shellcode加载的几种方式

前言

什么是shellcode

什么是shellcode加载器

shellcode的加载器的原理

加载方式

函数指针0x01

1
2
3
4
5
6
7
8
9
10
11
12
13
14
#include<Windows.h>
int main(){
//1.申请可读可写可执行的内存
LPVOID lpBuffer = VirtualAlloc(NULL,521,MEM_COMMIT,PAGE_EXCUTE_READWRITE);
//2.写入内存
memcpy(lpBuffer,shellcode,521);
//3.声明函数指针
typedef void(*Shell)();
//4.给函数指针赋值
Shell start = (Shell)lpBuffer;
//5.执行函数
start();
return 0;
}
阅读全文

windows系统编程

进程相关基础

创建进程

1
2
3
4
5
6
7
8
9
10
11
12
13
14
15
16
17
18
19
20
21
22
23
24
25
26
27
28
29
30
31
32
33
34
35
36
37
38
39
40
41
42
43
44
45
46
47
48
49
50
51
52
53
54
55
56
57
58
59
int CreateProcessDemo()
{
/*
DWORD cb; 当前结构的大小,需要事先填充,防止后续新增字段导致结构体大小变更
LPWSTR lpReserved; 保留字段未使用
LPWSTR lpDesktop; 指定桌面名称
LPWSTR lpTitle; 控制台程序的窗口标题
DWORD dwX; 新窗口的位置信息和尺寸信息
DWORD dwY;
DWORD dwXSize;
DWORD dwYSize;
DWORD dwXCountChars; 新窗口控制台可以显示的行数和列数
DWORD dwYCountChars;
DWORD dwFillAttribute;指定控制台程序的背景颜色
DWORD dwFlags; 标志,指定当前结构的哪些成员是有效的
WORD wShowWindow; 窗口的显示方式是什么
WORD cbReserved2; 保留字段
LPBYTE lpReserved2; 保留字段
HANDLE hStdInput; 标准输入句柄
HANDLE hStdOutput; 标准输出句柄
HANDLE hStdError; 标准错误句柄
*/
STARTUPINFO StartupInfo{};
StartupInfo.cb = sizeof(StartupInfo);
PROCESS_INFORMATION ProcessInformation;
BOOL rtn = CreateProcess(
//_In_opt_ LPCWSTR lpApplicationName,
L"G:\\Tools\\Layer5.0SAINTSEC\\Layer.exe",//想要执行的程序路径
//_Inout_opt_ LPWSTR lpCommandLine,
NULL,//要传递给可执行模块的参数
//_In_opt_ LPSECURITY_ATTRIBUTES lpProcessAttributes,
NULL,//进程安全属性,如果是NULLL则使用默认的安全属性
//_In_opt_ LPSECURITY_ATTRIBUTES lpThreadAttributes,
NULL,//线程安全属性,如果是NULLL则使用默认的安全属性
//_In_ BOOL bInheritHandles,
FALSE,//指定了当前进程中的可继承句柄是否可以被启动的新进程所继承
//_In_ DWORD dwCreationFlags,
0,//指定新进程的优先级和创建标志
//_In_opt_ LPVOID lpEnvironment,
NULL,//指定新进程使用的环境变量
//_In_opt_ LPCWSTR lpCurrentDirectory,
NULL,//指定新进程使用的当前目录
//_In_ LPSTARTUPINFOW lpStartupInfo,
&StartupInfo,//启动信息
//_Out_ LPPROCESS_INFORMATION lpProcessInformation
&ProcessInformation //进程相关信息
);
if (!rtn) {
printf("Create Process Field!");
}
else {
printf("dwProcessId:\t%d\n", ProcessInformation.dwProcessId);
printf("dwThreadId:\t%d\n", ProcessInformation.dwThreadId);
printf("hProcess:\t%d\n", ProcessInformation.hProcess);
printf("hThread:\t%d\n", ProcessInformation.hThread);
}
system("pause");
return 0;
}
阅读全文

8086汇编

汇编

调试

1
2
3
4
5
6
7
debug test.exe
-r 查看当前的状态,包括寄存器、 地址和汇编指令
-p 单步步过
-t 单步步入
-u 查看汇编代码,在输入u接着显示
-d 0d9a 显示内存
-g 退出
阅读全文